Thursday, 31 March 2016

Turnitin Assignment shows a ‘Read Only’ mode?


You might find the message on the right in your turnitin activities.

A. What does this message mean?

When you are using the Moodle Direct v2 plugin and a Turnitin activity is created for the first time in a course, a Class ID corresponding to that course is applied in the Turnitin database.

The default end date for this ID is set to six months from the creation date or to the date of the latest post-date for the Turnitin assignments in the class. Once the end date is reached, the Turnitin course becomes “expired,” which means any submissions in the class are read-only.

B. When is it happening?

This is a problem that is happening in this course because you are reusing Turnitin Activities created last year or in the years before. When you start a new semester you get a copy of your course where you can reuse everything from the last year but you shouldn't reuse the Turnitin activities, in that case, everytime you start a new semester, you need to delete the old Turnitin activities and create new activities.

C. How do I solve the problem?

To solve this problem the post date will need to be extended by...

1. Go to your course main page and click in the Turnitin activiy link where you have the read only mode

2.Mare sure you are on the Summary tab. You will see the Start, Due and Post Date as in the screenshot below...


3.On the right (see above in red) click in the icon and you will see the dates as below...


4. Change the Post Date to a future date (*Note: The Post Date is the date that marks and feedback from GradeMark are released to students).

5. Open some of the student reports and check that now the read mode is not showing

6. Go back to the same setting and set the 'Post date' to it original value or to the date you wish

7. Even you changed the date back to it's original value, the read only mode still not appearing again


* To solve this issue I got inspired here

**Here and here are complete guides for Turnitin in Moodle Direct V2

Please write your comments bellow.

Thursday, 24 March 2016

Easygenerator Review. Content generator (Video)


Below is the 30 minutes introductory video in the a new e-learning authoring tool: 'Easygenerator'


After watching the video, I am listing a short review in what I found interesting about this tool:
  • Everything is done online: content developers do not need to download any program to their computers
  • Possibility to link objectives, contents and questions so you can easily change the order in which these are shown to students. A great idea, when compared with similar e-learning authoring tools. 
  • Possibility to publish in HTML or SCROM place the course in a LMS or you can just use the 'easygenerator' server to store the course and send the online link to students
  • They still developing new features 
Prices comparison with Articulate.

If you need a tool that can be used online easygenerator is cheaper as you see bellow but it doesn't have the potential of Articulate Studio or Storyline when ti comes to create interactive contents

Below are two screenshot with a list of prices to make it easier to compare articulate online and Easygenerator:

Easygenerator...


Articulate Online...


Wednesday, 23 March 2016

Nice CSS in Moodle

I will be adding here nice css Moodle designs as a way to do not lose the link I find. It maybe of interest of the reader too...

  • http://dentalsupply.com.my/academy/

Moodle dabase error: 'question categories should belong to a valid context'

When running a ‘health-check’ test in Moodle (to do that just go to the next address in your intallation: http://mysite.com/admin/tool/health)

You might find the problem 'Question categories should belong to a valid context', it's not an important problem for your database but still you might want to solve it.


If you  have this problem, when running ‘health-check’ you will get something similar to the below...


Accoding to this post in the Moodle community, the safest way to sort out this problem would be to...

1. Create a temporary course.
2. Find that course's context id.
3. change the orphan question_categories (in the database) to point to the temp course context id.
4. Go into the question bank for the temp course, and see what is there, and either move anything that should not have been deleted to the right place, or delete anything that is junk.

If you want to  to solve the problem in a easier way you could go to the the quiz listed in the error and delete the problematic questions form it. The problem is that the quiz title in the error list is not clickable so you will need to find the in which course is your quiz and go there to delete the questions.

If you have a lot of courses there could be a problem to find the quiz. what I did in the above situation was to find all the courses with quizzes using the information in this post and after search them for the specific quiz.

Please write your comments below.

Tuesday, 22 March 2016

External tool activity in Moodle (video)


You can link external sites to your Moodle, Sites which allow connection to Moodle in this way are known as LTI compliant and are called Tool provider. Here is a list of that sites

In a Moodle course, when clinking in 'Add an activity or resource' you can add an 'External tool' activity.


An administrator can configure external tools in Settings > Site administration > Plugins > Activity modules > Manage Activities. Once there click in 'Settings' in the 'External tools' row so that they are available across the site.

There you can see an interface and clicking int the help icon you can read as follows...

External tools allow Moodle users to seamlessly interact with learning resources hosted remotely. Through a special launch protocol, the remote tool will have access to some general information about the launching user. For example, the institution name, course id, user id, and other information such as the user's name or e-mail address.

Tool types listed on this page are separated into three categories:

Active - These tool providers have been approved and configured by an administrator. They can be used from within any course on this Moodle instance. If a consumer key and shared secret are entered, a trust relationship is established between this Moodle instance and the remote tool, providing a secure communication channel.
Pending - These tool providers came in through a package import, but have not been configured by an administrator. Teachers may still use tools from these providers if they have a consumer key and shared secret, or if none is required.
Rejected - These tools providers are flagged as ones which an administrator has no intention of making available to the entire Moodle instance. Teachers may still use tools from these providers if they have a consumer key and shared secret, or if none is required.


After the external tools are configured in teh above section, if you go to a course and click in 'Add an activity or resource' you can add an 'External tool' activity as in the following video...


To add an  external tool will be very useful in order to  take advance of the huge amount of external resources online.

More information in the Moodle comunity...
External tool settings
Using External tool


Used Moodle 2.7

Please write your comments below.


Running the enire Moodle site via https

If you are concerned about security in your Moodle installation and want to avoid session hijacking you can activate https for all the site.

First of all, you will need to find a low trafic time in your organization to switch the whole site to redirect to HTTPS as the logged users will be automatically logged out  at the moment of the change.

To see your actual settings go to Administration--Site administration--security--HTTP security


As you see in yellow in the above screenshot, under HTTP security you will find the option 'Use HTTPS for logins'. You might already have this option checked, if not, checking this option will make Moodle use a secure https connection just for the login page. As it read in the help text bellow the option ...

Turning this on will make Moodle use a secure https connection just for the login page (providing a secure login), and then afterwards revert back to the normal http URL for general speed. CAUTION: this setting REQUIRES https to be specifically enabled on the web server - if it is not then YOU COULD LOCK YOURSELF OUT OF YOUR SITE.

To  activate https for all the site you do not need to play with the above options under the  "HTTP security" in Moodle, rather you can follow the next steps...


  1.  Configure your webserver for HTTPS by listening at port 443
  2.  run a migration script  to change every mention of http urls to https. 
  3. For a professional site, you need to get your SSL certificates signed by a certification authority.
There is a post in the Moodle community where someone doing the above is finding some problems (last post here)...


Re: Moodle entirely over SSL?Marc CoutureSaturday, September 12, 2015, 3:24 AM
I know this is an older thread, but we just switched over our production site to SSL everywhere (using Moodle 2.8.5) and are encountering various issues, including:
Problems with restored courses not properly modifying course IDs in some linked documents (especially those pointing to Legacy files);"Connection error" messages that require users to refresh their pages (sometimes resulting in loss of data in submitted forms).Any ideas on possible solutions? update and run migration script to change every mention of http urls to https


Also, in the same thread, I found 2 other helpful posts dealing with that task...

1. 
Re: Moodle entirely over SSL?Visvanath RatnaweeraTuesday, November 17, 2015, 5:44 AMGroup Particularly helpful Moodlers
The CPU overhead is passé. The tune today is HTTPS everywhere!
So the decision is between HTTP and "entirely over SSL". If you go for the latter no need to play with the "Use HTTPS for logins" option, rather you configure your webserver for HTTPS by listening at port 443. Additionally you may want to redirect HTTP to HTTPS.
For a professional site, you need to get your SSL certificates signed by a certification authority.
2. 
Dan MarsdenTuesday, November 17, 2015, 6:17 AM
you will need to modify your config.php to use "https:" in the wwwroot instead of "http:"
As Visvanath mentions - the overhead caused by running full-time ssl is very minimal - and in most cases you won't notice a difference - just make sure you have tuned your server well and read the usual performance recommendations (https://docs.moodle.org/30/en/Performance_recommendations [^])

Apart from taking in consideration the above posts, it would be great if you run a performance test in the site before switching to HTTPS and after, so you could see the impact performance impact on the site.

You might want to do a test in a Moodle installation with few or no users before going ahead in your production site.

Search for all courses with specific Moodle Activities


Sometimes you will need to know all the courses with an specific activity running in it. Please follow the next steps...

1. Administration--Site administration--Plugins--Manage activities.
2. You will get a page showing a table with all the activities  in your site...and the

The information in that table will be...
Activity module
Activities (Number)
Version
Hide/Show
Settings
Uninstall

3. Click in the Activities (Number) column close the the activity you want to search courses for...


4. In the above example, a new window will open listing all the courses with the Assignment activity in them

Please write you comments bellow.

Monday, 21 March 2016

Rubrics and a Grading Forms in Turnitin (Moodle)

It's possible to create a Rubric and a 'Grading Form' and apply it to a Turnitin assignment.

How to create a Rubric 

Follow the next steps...
  • Click on the Turnitin Assignment link on your course.
  • Click on the Submission Inbox tab. You will see all of the students in your course


  • Click on any Submission title link to be taken to the Turnitin assignment for this student.  (Rubrics cannot be assigned to an assignment until at least one paper has been submitted)
The assignment will open in a new window as below...
  1. Click in the Grademark tab (top left)
  2. Click the Rubric icon in the bottom right (see screenshot below)
  3. Click the 'Rubric Manager' in the top right (see screenshot below)


A new window will show up.

  • Click 'Create a new Rubric' as below...


You will see a layout where you can design your rubric..


All red arrows, in the above screenshot, indicate editable settings in the layout. A, B and C indicates...

A. Standard rubric - allows you to enter scale values and criteria percentages. The maximum value for the Standard rubric will be the same as the highest scale value entered
B. Custom rubric - allows you to enter any value directly into the rubric cells. The maximum value for the Custom rubric will be the sum of the highest value entered in each of the criteria rows
C. Qualitative rubric - allows you to create a rubric that has no numeric scoring

Once you finish editing your rubric just click 'Save' in the bottom right and the rubric will show up on the right sidebar.

To score each student you just need to…

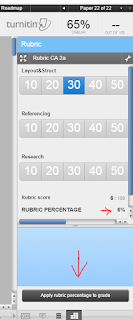
  1. Click in the grade from 10 to 100
  2. See that the in the bottom the ‘Rubric Percentage’ updates as you click
  3. When you are done, click the button ‘Apply rubric percentage to grade’
  4. The score will show in the student gradebook after the ‘post date’
If you want to create more rubrics you can add a new rubric going through the same process…

Click the rubric manager as below…


How to create a Grading Form

The process is similar to the Rubric, just that to create a grading form you will need to select "create new grading form" from the menu in their Rubric/Form Manager. The instructor will then be able to create a list of criteria and enter an optional description for each criterion.

The main difference I see between Rubrics and a Grading Forms are...

  • Grading Forms allow you to enter the grade number.
  • Grading Forms allow to write a comment for every criteria.
  • Grading Forms do not allow you add a different weight for each criteria. 


Hope that help. Please post your comments below.

Moodle SSL Certificate and HTTPS

To avoid session hijacking in your Moodle site you will need to activate https in the entire site. Please look at the next links in order to learn more...


I found the two links above specially helpful. Also, you might want to have a look to the next link in general recommendations for Moodle security


Wednesday, 16 March 2016

Moodle vs BlackBoard


https://www.insidehighered.com/news/2014/02/13/moodle-tops-blackboard-among-small-colleges-analysis-says
http://www.ispringsolutions.com/blog/moodle-vs-blackboard/
http://uki.moodlerooms.com/
http://9thlevel.ie/tag/moodle/
http://enhancingteaching.com/2013/03/25/interested-in-collaborating-on-moodle-2/
https://www.timeshighereducation.com/news/cyberattack-shuts-down-virtual-learning-platform/2020378.article

Tuesday, 8 March 2016

Moodle: Remote RSS feeds block (video)

A. Enable RSS feeds in your Moodle intallation...

1. Enable them in the site in Settings > Site administration > Advanced features
2. Enable RSS feeds for database activities, forums and/or glossaries in Settings > Site administration > Plugins > Activity modules. Below setting number 1 we can read: If enabled, RSS feeds are generated by various features across the site, such as blogs, forums, database activities and glossaries. Note that RSS feeds also need to be enabled for the particular activity modules.

For example, If we want to enable the RSS for the forum we need to go to step 2 and click in Forum and after search for Enable RSS feeds and enable it. Below it we can read the next...
This switch will enable the possibility of RSS feeds for all forums. You will still need to turn feeds on manually in the settings for each forum.

B. Add a RSS feed in the sidebar of  your courses 

  1. Enter the main page in your course
  2. Click the button 'Turn Editing On' in the top-right of the page
  3. Scroll down, in your right sidebar, until you see the block called 'Add a block' and, under it, click 'Add' in the drop-down list you need to find and select the block 'Remote RSS Feeds
  4. The 'Remote RSS Feeds' block will then be added to your right sidebar
  5. You will need to configure this new added block, for that click the little wheel that you see in the header of the block (to see this 'wheel' the editing need to be turned on in your course)
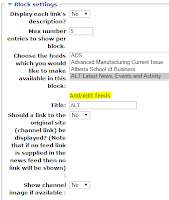
  6. Under 'Block settings' click in the link 'Add/edit feeds' (see this option in yellow in the screenshot here in the right hand side) you will then see a list of RSS feeds added by other teachers in Moodle
  7. To add you own RSS Feeds scroll to the button of the page and click 'Add a new feed
  8. Enter a 'Feed URL' obtained from a website that is providing this service
In the next video you can see how to find a RSS URL address in a website...

  1. Click 'Save Changes' in the bottom of the page
  2. Go back to your course main page. 
  3.  Click the little wheel and click 'Configure block'  in the 'Remote RSS Feeds' block in your right sidebar 
  4. Under 'Block settings', you need to choose which feeds will finally be added to your course, for that you need to select your chosen feeds in the box in the right of  "choose the feeds which you would like to make available in this block" (To select multiple feeds at a time, hold down the 'control key' and click in the feeds at the same time)
  5. Click 'Save Changes' in the bottom of the page and check that your RSS block (in the right sidebar in the course from page) is showing the links to different feeds. This feeds will update according to what is happening in the website you chose.
See the below video in how to do the above...


Please write your comments below.


Main Site Administrator permissions

There seems to be no difference between the Main Site Administrator  and a normal 'Site Administrator ' The main administrator can be removed just as any other user by first removing its role as administrator (if another administrator account has been created)

There should be a mistake in the Moodle instructions in this page as it reads that the main admin cannot be removed and I just removed the main admin.