The lesson activity is one of the most powerful in Moodle but it´s also one of the less used. Maybe due to the number of settings and complexity that lesson imply.
After watching this video the Lesson activity will have no secrets for you.
I have recently been working on a MoodleCloud project and I would like to give some general insights about how Moodlecloud feels in comparison with self-hosting your own Moodle...
2) Moodle Tools. I found out a tool that is not available in MoodleCloud, Language Customization...
3) Domain customization is not posible:when signing up for MoodleCloud you select your site name. E.g: yourcompany.moodlecloud.com
It´s not possible in Moodlecloud to customize the url and .moodlecloud.com will always show in your url.
To some people the above is not a problem but there are some other that do not like like it. There is no way around it if using MoodleCloud. If you want a customized URL (e.g. sitename.com) you will need to self host your own site.
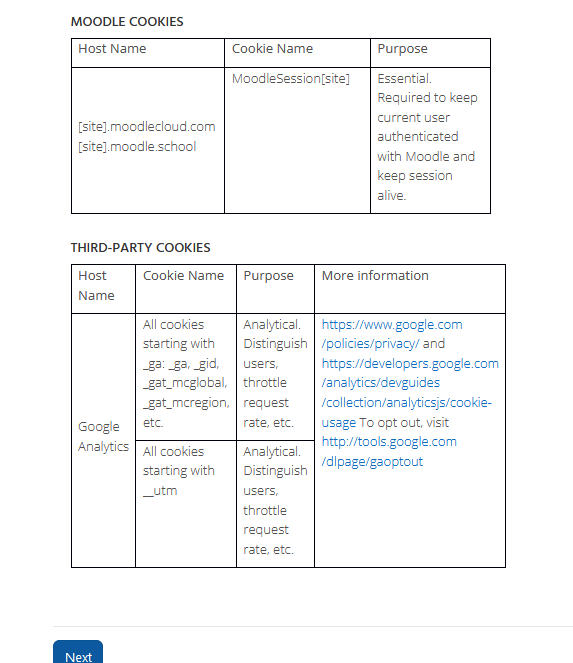
4) MoodleCloud policy showing on first login:every user will have to accept the policy one time (on their first login).There are 3 different pages that the new users need to read. You can add more pages or new policies in the top of those already there but there is no way to remove the policies.The reason is that MoodleCloud doesn´t want to risk any gdpr infrictions on their sites.
All your users would need to click the next button three times before they reach the last page where they can agree with all the policies...
After marking the two boxes in this last screen and clicking next the user will land inside the Moodle dashboard.
MoodleCloud is a service that allows anyone to get started with Moodle within minutes and automatically builds a Moodle site to a certain level (1000 users and 5Gb of file storage).
As you see the minimum price is just €100 and it's very easy to start using it with a few clicks when going to the "Create New Account" page (free for 45 days).
2) Server side tools already set and available . MoodleCloud team hosts your Moodcloud in a server that is optimised for Moodle and that means that a lot of tools are already working out of the box.
If you host Moodle in your own server you or the server company will need to make sure some specific tools are correctly set in the server side. See some examples...
- BigBlueButton: videoconferencing tool that is totally integrated in MoodleCloud. This is a huge advantage. To get this working for a self-hosted site will cost you a lot of time and money and in MoodleCloud you get it out of the box.
- Annotate PDF: tool that allow teachers to Annotate student submitted files and for students to see the feedback provided by the teachers.
- ...
3) Upgrades are included. The MoodleCloud team keeps your site upgraded that will give you peace of mind and allow you to focus in your studens.
Let's say you are a very small company and want to train less than 50 users, if you go for the self hosted solution you will end up paying the €100 to your hosting provider but you will also need to pay a developer to keep continuously upgrading your site, while in MoodleCloud you don't have to worry about upgrades (MoodleCloud team keeps your site upgraded) and server problems that normally are a lot.
The conclusion is that MoodleCloud is a great option if you don't have plans to have a big number of users. If you have plans to get beyond that 1000 users you will need to get a self hosted site.
If you need to download all course files (pdf, Microsoft office documents...) there is no simple way to accomplish it.
A solution could be to back-up the course and automatically extract the files using a Jar file that an user of the Moodle community programmed: have a look to Veronica's post in this thread
The Moodle administrator can configure the “Default messages output” for the whole site under “Site administration”—Plugins—Message outputs-- Manage message outputs, as bellow:
Moodle users will, as well, be able to configure the “notification methods for incoming messages” by clicking in “Messaging” under their profile:
Uploaded to Youtube by Linn-Benton Community College
As well, users will be able to configure the “Email digest type” when editing their profile settings as below:
Uploaded to Youtube by UOWLAB
Moodle community related page here Please write your comments below...
1.Click the month on the Calendar to get an expanded month view
2.In Calendar view click the “New Event” button
On a 'New Event page' select the type of event
1.A User Event will only be visible by the user currently logged in (i.e. the one creating the event)
2.A Course Event will be visible to participants on the course in question. Only users with the capability to manage calendar entries at the course level can add course events.
3.A Site Event is a "global" event - visible in every course and on the calendar on the home page. Only users with the capability to manage calendar entries at the
You need to take into consideration the next:
1.Just the Moodle administrator at a system level can add site events.
2.The different types of events can be visually filtered by teachers and students
3.Adding closing dates to course activities — assignments, quizzes etc. will cause them to show up in the calendar block as course events.
Number of Upcoming Events in the ‘Upcoming Events block’
To set the number of upcoming events you will be able to find a setting when clicking in ‘Preferences’.
The number of events and days in advance is determined by the calendar_lookahead
The number of eventsand look-ahead has a setting in ‘Preferences’ on the student page
At an administrator level, the default number of
events and other preferences can be set in the ‘Maximum upcoming events’
setting inSite Administration > Appearance > Calendar.
If the Upcoming Events block becomes too long you can reduce the number of days and events to lookahead.
Calendar export
Integrating the Moodle Calendar with google calendar
In Google Calendar's "Other calendars" menu, choose "Add by URL" and supply the URL generated in the process described above.
The Google calendar will update when making changes in the Moodle calendar but it will take several hours.
Uploaded to Youtube by Chicago State University
Integrating the Moodle Calendar with iCal
Uploaded to Youtube by Chicago lynda.com
Integrating the Moodle Calendar with Outlook
Uploaded to Youtube by Chicago lynda.com
Import Calendars
Click the button "Manage Subscriptions", fill up the required fields and click "Add"
To hide this link under the Navigation block you can alter the Moodle code as described here or you can just select 'Categories and courses' in the setting 'Generate navigation for the following' when editing the configuration for the Navigation block (See bellow screenshot)
You can make blocks sticky at different levels in Moodle:
Sitewide
Homepage
Category
Course
Activity/Resource
To make a block sticky in a category you just need to navigate to the category and add the block, once added you need to "configure the blog" and in "Page context" choose
Note: To delete a block completely, in addition to uninstalling it on the blocks page, you also need to remove/delete the actual block folder from the moodle/blocks folder, otherwise Moodle will reinstall it next time you access the site administration.
Screen readers just read the text in the Moodle content editable regions but do not give information about if there are images, links...
The screen reader helper in the editor generate a list of any any images or links in the text
In the below screenshot the white text-box on the top-right is the information provided by the screen-reader according to the information in the editor....
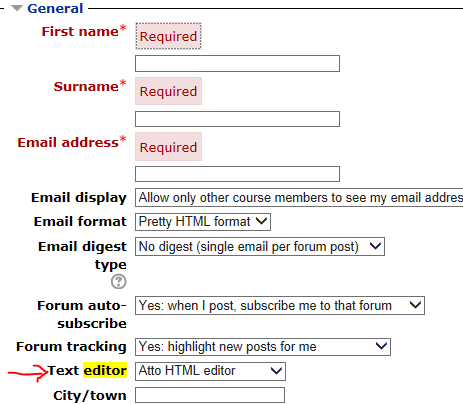
You need to go to Settings > Site administration > Plugins > Text editors > Manage editors. There you can choose the editor plugins you wish to use and arrange them in order.
If you want to add or delete buttons in lets say the "Atto HTML" editor you will need to do the following:
Click in settings to edit them:
Consider that...
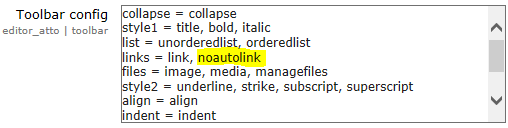
The configuration consists of groups (one per line) followed by the ordered list of plugins for that group. The group is separated from the plugins with an equals sign and the plugins are separated with commas. The group names must be unique and should indicate what the buttons have in common. Button and group names should not be repeated and may only contain alphanumeric characters.
According to the above you will be able to add or delete button by adding the button name in the correct group.
For example, if we want to add the noautolink button we will need to add the word "noautolink" to the list as bellow...
Autoliking is a Moodle's feature that automatically links (within a course) text typed in Moodle to:
Glossary activity entries
Database activity entries
Activity and resources names
Autolinking can be set at four different levels:
1. Site wide: it can be switched on/off by going to Settings > Site Administration > Plugins > Filters > Manage Filters.
Note: Applying filters to headings as well as content can greatly increase the load on your server.
2. Moodle courses: it can be managed within individual courses from Settings > Course Administration > Filters
Resources & Activities within a Moodle course: it can also be managed from within an activity or resource from Settings > [Activity name] Administration > Filters. Below is a videotutorial for turning off auto-linking to glossaries in a quiz.
Video uploaded to youtube by David Appleyard
Specific text : it's possible to disable autoliking within activities and resources by highlighting the text and clicking on the Prevent automatic linking button (chain with a cross through it, see screenshot below).
Note: Alternatively, when going to the HTML in the editor you can add the <nolink> ... </nolink> tags around the relevant content.
Enabling/Disabling blogs. Blogs in Moodle are enabled by default: Site administration > Advanced features
Site administration settings: Site administration > Appearance > Blog
Enable blog associations: Enables the association of blog entries with courses and course modules.
Blog visibility: restrict the level to which user blogs can be viewed on this site.
Enable external blogs: Enables users to specify external blog feeds. Moodle regularly checks these blog feeds and copies new entries to the local blog of that user.
External blog cron schedule: How often Moodle checks the external blogs for new entries.
Enable comments in blogs
Show comments count
External blogs: to register and external blogs, such as Blogger or Wordpress so that entries are automatically included in your Moodle blog.
Go to Settings > My profile settings > Blogs > Register an external blog
Blog menu BLOCK: The blog menu block provides context-sensitive links for adding an entry about the course or a particular activity (if blog associations are enabled for the site and if a user has appropriate permissions).
In the course "assignments" it's important to keep in mind the setting “Show only active enrollments” as it could be enabled and hide the submissions for the students for whom a certain “Enrolment duration” (length of time that the enrolment is valid, starting with the moment the student enrols themselves.) have been set.
As well, remember that when using the "self enrolment method" you can set up a default "Enrolment duration" for all the student that self-enroll in a course.
Under the above, and when “Show only active enrollments” is enabled the student submissions will not show when clicking in the assignment--View/grade all submissions
You can access this setting in different places in a Moodle course:
1. Course Assignment:
Click in an assignment in the course main page--View/grade all submissions
Click in an assignment in the course main page-- Administration block--Assignment administration--View/grade all submissions--Options
When changing this setting in any of the course Assignments the other assignments in the same course will as well change automatically.
To allow students to write math expressions in Moodle there is an standard filter in Moodle called 'MathJax' (open source). You can see if it's enabled under Course administration--Filters
MathJax is an open-source JavaScript display engine for LaTeX, MathML, and AsciiMath notation that works in all modern browsers.
MathJax allows page authors to write formulas using TeX and LaTeX notation, MathML, a World Wide Web Consortium standard for representing mathematics in XML format, or AsciiMath notation.
If you go to Site administration ▶ Plugins ▶ Filters you will be able to see the configuration for the MathJax filter. By updating the version number in the field 'HTTP MathJax URL' you can update the version of MathJax you are working with.
If it's enabled you are going to be able to write mathematical equations and expressions into any place in Moodle where the Moodle editor is displayed. For example if you go to the editor and write the next:
when you clicking save you will get the next result:
Another tool that could be interesting is to have the STACK: it is a computer aided assessment package for mathematics, which provides a question type for the Moodle quiz. There are two classes of question types...
The Spanish newspaper 'La Vanguardia' published a video where Martin Dougiamas talk about the future of Moodle and where he point out the strong focus on Moodle for Mobile devices. You can watch that video by clicking in the bellow image.
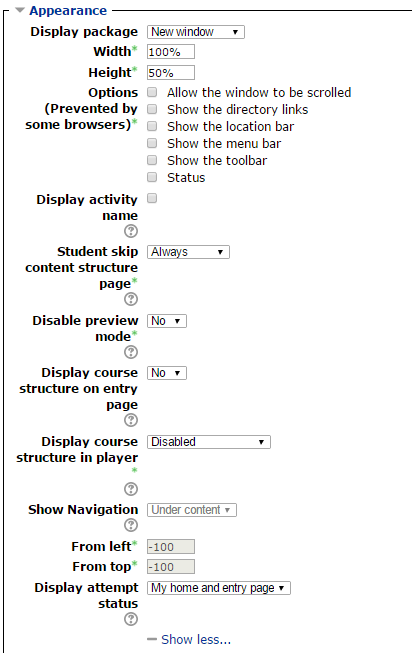
The right settings of an SCORM activity will depend in the SCORM packet you are adding but if you are adding an SCORM packet created with any of the most popular content authoring tools the below settings might give you a good output...
Activity completion allows you to set completion criteria. Activities with activity completion enabled will have a check box to the right of them on the home page.
As well, a new report link (Activity completion) will be enabled under 'Administration menu-Course administration-Reports' (see the screenshot on the right).
Clicking in that link you will be able to see the report with all the activities for each student. (see below screenshot) The boxes checked manually will show with a solid border and those checked automatically by the system will show up with a discontinuous border.
There are 3 levels to activate activity completion in Moodle:
Site: to enable activity completion you need Administration-Advancedfeatures and make sure 'Enable completion tracking' is on.
Course: edit the course Settings and make sure Completion tracking--Enable completion tracking is on
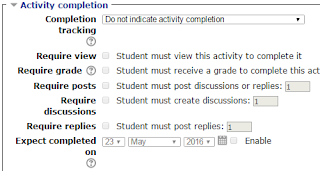
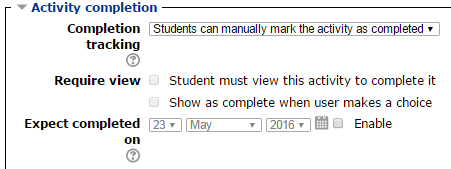
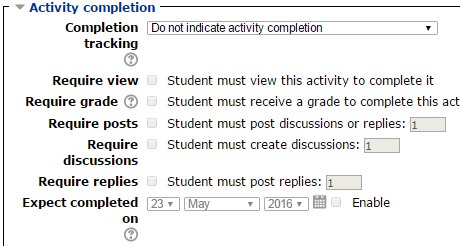
Activity: you will find three options when editing any activity in the course and going to the 'Activity completion' section...
Do not indicate activity completion - this will not show checks (ticks) next to the activity
Students can manually mark the activity as completed - students press the check (tick) to change it. (Note: they can do this even without doing the activity!)
Show activity as complete when conditions are met - the selected completion criteria must be met before the check (tick) will change style
Note: If you want the check box on the right of the activity in the home page to get selected automatically when the student view the activity you will need to follow the next two steps...
A. In the field completion tracking select 'Show activity as complete when conditions are met'
B. In the field Require View, check the box 'Students must view this activity to complete it'
Activity completion settings vary depending on which type of activity. Below are screenshots of the settings for the 14 different types of activities in Moolde.
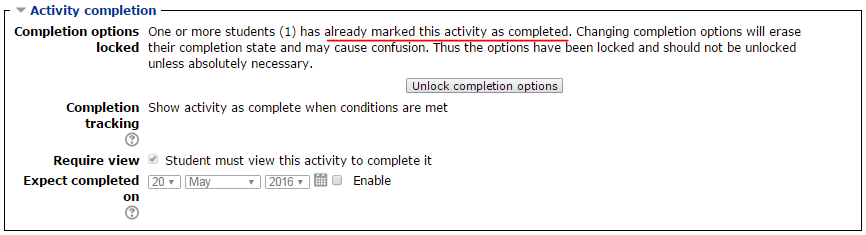
If you select 'Show activity as complete when conditions are met' then you will be able to check the box close to 'Student must view this activity to complete it'. If when setting it, the activity has already been set as complete for any of the students you will see the following message:
Advanced users will be able to hide certain activities or resources from the students until they complete some requirements i.e., a page can automatically appear to students after a quiz has been taken and a certain grade have been accomplished.