Wednesday 25 May 2016

Math in Moodle

To allow students to write math expressions in Moodle there is an standard filter in Moodle called 'MathJax' (open source). You can see if it's enabled under Course administration--Filters 

MathJax is an open-source JavaScript display engine for LaTeX, MathML, and AsciiMath notation that works in all modern browsers.

 MathJax allows page authors to write formulas using TeX and LaTeX notation, MathML, a World Wide Web Consortium standard for representing mathematics in XML format, or AsciiMath notation.

If you go to Site administration ▶ Plugins ▶ Filters you will be able to see the configuration for the MathJax filter. By updating the version number in the field 'HTTP MathJax URL' you can update the version of MathJax you are working with.

If it's enabled you are going to be able to write mathematical equations and expressions into any place in Moodle where the Moodle editor is displayed. For example if you go to the editor and write the next:


when you clicking save you will get the next result:


Another tool that could be interesting is to have the STACK: it is a computer aided assessment package for mathematics, which provides a question type for the Moodle quiz.  There are two classes of question types...

  • Selected response questions
  • Student-provided answer question

Tuesday 24 May 2016

Martin Dougiamas talking about the future of Moodle (Video)

The Spanish newspaper 'La Vanguardia' published a video where Martin Dougiamas talk about the future of Moodle and where he point out the strong focus on Moodle for Mobile devices. You can watch that video by clicking in the bellow image.


Monday 23 May 2016

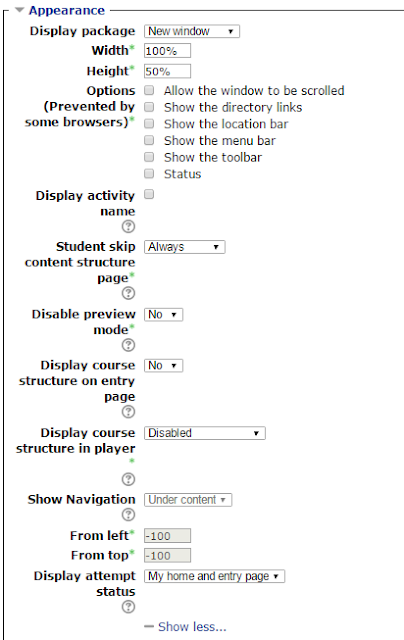
How to set the 'appearance' settings in an SCORM activity in Moodle

The right settings of an SCORM activity will depend in the SCORM packet you are adding but if you are adding an SCORM packet created with any of the most popular content authoring tools the below settings might give you a good output...


Friday 20 May 2016

Activity completion in Moodle

Activity completion allows you to set completion criteria. Activities with activity completion enabled will have a check box to the right of them on the home page.

As well, a new report link (Activity completion) will be enabled under 'Administration menu-Course administration-Reports' (see the screenshot on the right).

Clicking in that link you will be able to see the report with all the activities for each student. (see below screenshot) The boxes checked manually will show with a solid border and those checked automatically by the system will show up with a discontinuous border.


 There are 3 levels to activate activity completion in Moodle:
  1. Site: to enable activity completion you need Administration-Advanced features and make sure 'Enable completion tracking' is on.
  2. Course: edit the course Settings and make sure Completion tracking--Enable completion tracking is on
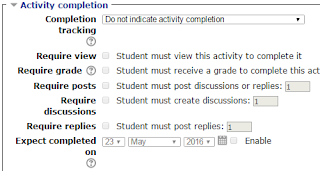
  3. Activity: you will find three options when editing any activity in the course and going to the 'Activity completion' section...
  • Do not indicate activity completion - this will not show checks (ticks) next to the activity
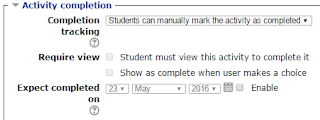
  • Students can manually mark the activity as completed - students press the check (tick) to change it. (Note: they can do this even without doing the activity!)
  • Show activity as complete when conditions are met - the selected completion criteria must be met before the check (tick) will change style
Note: If you want the check box on the right of the activity in the home page to get selected automatically when the student view the activity you will need to follow the next two steps...

A. In the field completion tracking select 'Show activity as complete when conditions are met'


B. In the field Require View, check the box 'Students must view this activity to complete it'


Activity completion settings vary depending on which type of activity. Below are screenshots of the settings for the 14 different types of activities in Moolde.

URL/Page/Folder/Questionnaire/Book/Chat/Survey/Wiki


Forum


Assignment


Quiz/Database/Glosary/Lesson


Choice


Feedback


Questionnaire


SCORM


If you select 'Show activity as complete when conditions are met' then you will be able to check the box close to 'Student must view this activity to complete it'. If when setting it, the activity has already been set as complete for any of the students you will see the following message:


Advanced users will be able to hide certain activities or resources from the students until they complete some requirements i.e., a page can automatically appear to students after a quiz has been taken and a certain grade have been accomplished.


Metacourse options in Moodle

A metacourse is a course that is linked to other course for it's user enrollment. So any enrolled users in the linked courses will them be student in the  course linking to them.

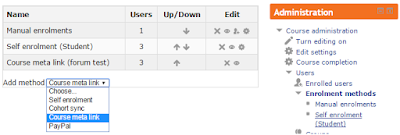
To activate it yo need to go to: Settings > Site administration > Plugins > Enrolments > Manage enrol plugins > Course meta link.

Once activated you need to go to Users--Enrollment methods under the 'Administration' menu and in 'Add method' choose 'Course meta link'. Select any course you want to link in the drop-down.


By default the users enrolled in a "child course" through Meta link will have the same role/s they have in the "parent course" where they were enrolled. If you want to change this you need to go to:

 Site administration / ► Plugins / ► Enrolments / ► Course meta link

There you can select the roles that you do not want to synchronize so the users with the selected roles in the "parent course" will come to the "child course" with no role. As well, in that page you can set the action to carry out when user enrollment disappears from the original course. The options are as follow:

  • unenroll users from course. Note: students un-enrolled and then re-enrolled in the course come back in with no grades
  • disable course enrollment
  • disable course enrollment and remove roles
Once you enroll an student using the meta link, It doesn't seem to be possible to un-enroll  her/him from the "child course" without un-enrolling her/him from the "parent course".

Here  and here are posts in the Moodle comunity dealing the the above.


Thursday 19 May 2016

Easy CSS in Moodle

I will be adding in this post some basic videos about CSS in Moodle.

1. CSS in Moodle doesn't have to be difficult. Here is an starting for beginners...


2. How to add CSS using the Moodle editor in a particular activity.


3. Moodle 2.2 Theming Tutorial


Please write your comments below...

Friday 13 May 2016

Access to the Turnitin Website for lecturers to see or print student's reports


1. Go to the next address: http://turnitin.com
2. Click login in the top-right of the page
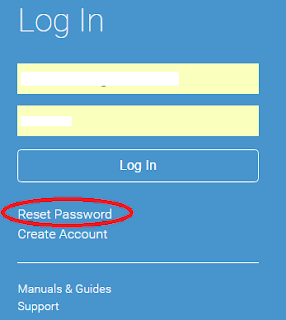
3. If you know your password enter it and go to step 4. below, if you do not know it click “reset password” and follow the steps 3.1 to 3.6.
3.1. Enter your email and your last name and click “Next”
3.2.  You will see the below screen. 
3.3. You will need to go to your email and find the message sent to you by Turnitin and click in the link. Set up your new password (make sure you write it down so you do not forget it).Once you do that you will see the bellow screen. Click in the link in yellow
3.4. Click in the top-right to login again.
3.5. Enter your email and password


3.6. Select a question and answer it and click “Submit”
4. Find the class (Moodle course) name and click in it.


5. A list with the different Turnitin assignment you created into that Moodle course will appear. Click on the right of the course in the “View” link.

6. A list of students and submissions in that Turnitin assignment will appear. To see the report for any of the student you just need to click in the “TITLE” or “SIMILARITY” as in red bellow.
 
You  will see the originality percent and if you want to upload any student’s submitted files to your computer you will need to follow the next steps…
6.1. Click in the file icon as is marked in red bellow.
6.2. A popup window will open. Click to download the “originally submitted format”


6.3. You will see the file in the bottom left of the window.


Thursday 12 May 2016

Adding a Turnitin Assignment To Moodle (Turnitin Plugin: Direct V2 plugin)

To add a Turnitin assignment to a course in Moodle you need to follow the next steps...

1. Go to the main course page in any of your courses.
2. Click to "Turn Editing On"


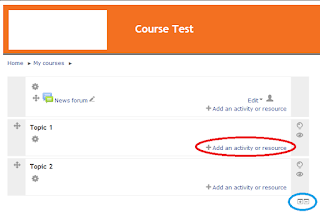
3. Click "Add an activity or resource" under the topic you want to add the Turnitin assignment.


4. Choose "Turnitin Assignment" in the left sidebar in the popup window and click "Add"


5. This will take you to the Turnitin assignment settings page where each setting is explained bellow.

Note: if you are setting an official assignment for the student to submit your settings might look as the below screenshot. The settings for  "Exclude Bibliography" and "Exclude Quoted Material" are up to you.
If you just want to set up a self check assignment  for the student to self check the field "Store Student Papers" will need to be set as "No Repository"


Note: each of these settings are explained at the end of this article.

6. Click the "Save and display" button at the base of the settings page. This will save the assignment and bring you back to your Moodle course page. 

7. To set the assignment due and post date click the link for the Turnitin assignment on the course page:


8. Click  the edit icon (on the far right-hand side)

9. Specify the assignment dates

Note: The Post Date refers to the availability of grades and feedback to students if you are using Turnitin’s grading and feedback tools. Don’t worry if you aren’t using these features of Turnitin. You just need to ensure the Post Date is on or after the assignment Due Date.

10. If you want to edit the settings (title, description, or other settings) course, turn editing on and click on the edit icon beside the assignment you created.


Specific settings are explained below

The first settings to complete are the Turnitin assignment name and Summary. You should also specify whether you wish to display the summary/description on the course page.


Select the assignment type. You can specify students upload their assignment either as a file upload or by copying and pasting some text in to the assignment window. You can choose Any submission type to give students an option.

To complete the assignment settings enter the details as explained in the table below.


Assignment Settings

What this Means

Number of Parts
Allows for the creation of a multi-part assignment, individual users in a group may submit one piece of work to each part.
Maximum File Size
This setting determines the maximum file size for user submissions to each assignment part.
The maximum value you can set is dictated by the value set in course settings. This value is further capped to a maximum file size of 20MB which is the maximum allowed file size for file uploads to Turnitin.
Student Originality Reports
Allows you to display Turnitin originality reports to student users. If set to yes the originality report generated by Turnitin are available for the student to view.


Click Turnitin Advanced Options to reveal additional settings:

Then complete the additional settings as follows:


Assignment Settings

What this Means

Allow Late Submissions
Specify whether you want to allow late submissions by students. If you do, late submissions will be highlighted.
Report Generation Speed
Options
1.    Generate reports immediately, first report is final: Originality reports for all submissions will be generated immediately. Students cannot resubmit papers. Submissions must be deleted by the instructor to enable resubmission.
2.    Generate reports immediately; reports can be overwritten until the due date: Originality reports for the initial submission by each student user to this assignment will be generated immediately. Students may resubmit as often as they wish until the assignment due date. Originality reports for the second or subsequent submission require a 24 hour delay before the originality report begins processing. Only the latest submission is available to the instructor/student.
3.    Generate reports on due date: Students can only see their originality reports once the due date has passed.

Store Student Papers
Options
1.    Standard Repository: Saves copies of students’ submissions to the Turnitin repository for future matches.  This would include each student’s assignment as text for Turnitin to check against in the future.
2.    No Repository: Copies of students’ submissions are uploaded and scanned for originality, but are not saved to the Turnitin repository.

Check against stored student papers
Do you wish the student’s assignment to be checked for originality against other students’ papers that have been saved to the Turnitin Repository?
Check against internet
Do you wish the student’s assignment to be checked for originality against web pages?
Check against stored journals, periodicals, and publications
Do you wish the student’s assignment to be checked for originality against a selection of journals, periodicals, and  publications?
Exclude Bibliography
Do you wish to exclude the student’s bibliography from the originality check?

If the Exclude bibliography option is set to “Yes”, any content appearing in the work after one of the following keywords/phrases will be excluded from the similarity index:

·         references
·         references cited
·         references and notes
·         resources
·         bibliography
·         works cited

The keyword/phrase should appear on a line on its own.
Exclude Quoted Material
Do you wish to exclude any text the student has included in quotes from the originality check?
Exclude Small Matches
This option allows you to exclude small matches from the originality report. There are two options for excluding small matches; either by word count or by percentage. With this feature you have greater control on sifting out smaller matches, allowing you to focus on more problematic and suspect matches within the Originality Reports.

Turnitin have published instruction in reference to the same topic here


Turnitin error: M14: 11. Loading Error (Moodle Direct v2 plugin)

You might find this error when...

  • a lecturer attempts to open GradeMark to start marking a submission.
  • an student tries to see his/her submission in the 'Document Viewer'

According to Turnitin’s technical support team this error is due to:

  • Turnitin problems to process the paper when it contains complex content such as dense vector images. To work around this issue the student is advised to replace any vector images with raster images (jpg/jpeg, psd, png, tiff, bmp and gif) as this will reduce the processing time required. 
*Vector images examples: AI, EPS, WMF and PICT (Mac))
  • The paper has been deleted from the assignment inbox by the Instructor. Turnitin Support may be able to restore the paper at the Instructor’s request.
  • The paper is no longer accessible. This can happen with older papers.  In some rare scenarios, papers may become inaccessible.
There are some rumors in the net this error might not be due to the above but to Turnitin's problems in the conversion from word 2010 to pdf.

In order to solve the problem submit the paper again as it seems to work in a second round:

  • An student will be able to submit again just if due date is not passed and the settings allow re-submission.
  • The teacher can submit in behalf of the student but if the settings allow just 1 submission the first submission will need to get deleted in order to resubmit

Wednesday 11 May 2016

What are Filters in Moodle?

Filters are a way to automatically transform content before it is showed to the user in Moodle.
You can add a filter at the site level and then remove it at the course or activity level.

You can use filters to...

  • add links
  • insert multimedia players
  • convert Mathematical expressions 
  • convert emoticons into images 
  • and more...


Video created by Moodle
Here is the list of filters in Moodle.

If you are a developer and would like to create your own filters you could have a look tho this page.


There are different levels to activate filters:

1. Site-wide: Site administration--Plugins--Filters-Manage Filters. In order for Filters to show at a course or activity level they need to be enabled by an administrator.


2. Course: Administration--Filters


If you enable a filter at the course level it will apply to all the activities in the course.

3. ActivityActivity administration--Filters


If you enable a filter at the activity level it will apply just to this activity not to all the other activities in the course.

You can read more about how filters work in different contexts here

More about Managing filters here

Please write your comments below...

New Features In Moodle 3.1

Documentation for Moodle 3.1 is already available and bellow are some of the new features:

For teachers
Competency based education is now fully supported
Grading Assignment submissions has got smoother with all elements on one screen and the ability to annotate over student submissions of different file types
Important forum posts can now be pinned to the top of your list, making them more visible to your students
When setting up a workshop, you can now specify the types of file you want students to submit or not. Students may also now deleted their own submissions.
Shared external tool enrolment now allows you to share course activities and related grading between two Moodle sites
Course activities and resources may now be tagged, making it simpler to find related content.
Change section titles without leaving the course main page, speeding up your course creation
Search for meta linked courses and add them together in one step.

For administrators

Create competency frameworks for use throughout the site. (A plugin will also allow you to import from external sources.)
Create learning plan templates and apply them to individuals or whole cohorts.
Let your your staff and students search the site by enabling Global search and installing Solr
Teachers can annotate directly on uploaded submissions of different file types, not just PDF if unoconv 07 is installed.
If you’ve enabled a File system repository on your server for FTP uploading, your teachers can now search the folders in that repository
Make setting up a Lesson simpler for teachers by reviewing the default and advanced settings.
When a Folder resource contains many files, students can download them all in a zipped file.
Search all courses you have access to and quickly find that important resource.
Global search. Search all courses you have access to and quickly find that important resource.
The Message button is now next to the user's picture, making it much easier to send important messages.
New permalink feature makes it easy to share useful forum posts.

Please write your comments bellow.

Tuesday 10 May 2016

Turnitin Direct V2 Integration and LDAP authentication in Moodle

When using the LDAP authentication in Moodle, if an student is set as on hold (could be because he/she didn't pay the fees) in LDAP the student will still have the account and data in the Moodle database but he/she will just not able to login to Moodle.

Under the above circumstances, the student cann't login in Moodle so therefore can not do any submission in Turnitin.

But you might have some questions under the above circumstances,


1. What if a lecturer refresh the and student submission in a Turnitin activity and the student is not active anymore in LDAP, so he can not login into Moodle anymore?

When refreshing you will notice that the similarity changes to 'Pending' and Turnitin will not return any further report for that student, so the similarity percent showed by the Turnitin Direct V2 plugin in Moodle will always stay as 'Pending'.

2. What if a lecturer goes to the Turnitin activity and submit a paper in behalf of the student?

I still need to test it but I suppose the result of that action will be the same as in question 1 above.

Please write your comments bellow...